How to wire a contactor

Talk Electrician Forum

Help Support Talk Electrician Forum:

This site may earn a commission from merchant affiliate links, including eBay, Amazon, and others.

PoorFish

Well-known member
Joined
Oct 22, 2008
Messages
158
Reaction score
0
Hi Folks

Im back at college and have been let loose on some wiring problems.

I have fallen at the first hurdle and am having problems wiring a contactor up to a switch which will then control 2 lights.

I have never come across these before so have no experience of them at all.

the tutors seem to just want us to get on with it and figure it out for ourselves.

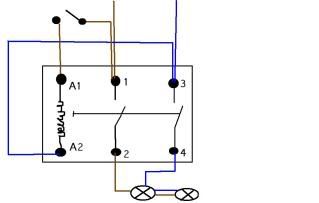
Im pretty confident that the live would go to A and that N goes to B.

It would seem that the 1,2,3,4 would correspond with each other but I cant see where the lights figure in with it all.

Im sure I am making it more difficult for my self than it really is but at the moment i feel pretty stumped. headbang

If anyone can give me a couple of pointers I would be really grateful

All the best

P

View attachment 247

img086.jpg

 
Hi P

Think some of your confusion may come from the fact your contactor drawing doesn't look quite correct. Just think of the contactor as a heavy duty electrically operated switch, as it is an electrically operated swich it needs a coil in it to operate it, in this case I am persuming it is a 240V AC coil. It then has contacts just as in a switch, in most cases 4 contact sets so 8 connections, and 2 small connections for the coil.

So if I understand your exercise correctly, you need to take your permenant live to 2 places, that is to one side of your switch and link to one contact on contactor.

Take Neutral to one side of the coil and link to another contact on the contactor, this must be on a different set than the live or you will cause a short.

Now take the switched live from the other side of the switch to the other coil connection. So if you operate the switch now the contactor will energise and close the contactor with a nice clunk sound, if it makes a clunk, bang sound with a blue flash you shorted the live and Neutral see above for contactor explanation again.

OK so now the contactor is closing and opening correctly, you have a Live and Neutral on 2 differewnt contact sets so you just need to parallel up your lamps, take one leg to the Neutral contact and the other to the live contact, both on the contactor.

So switch the switch on, contactor energises puts the live to your lamps and puts the neutral to your lamps. You do have the terminal block in between but just follow where you want the connections to go in a logical manner and you will be fine, if I have grasped the problem wrong or if you need more help just let us know. Good luck and let us know how you get on.

Steve

 
Just a small additon to my post, I am also persuming that the switch remains in what ever position you switch it to, as in a normal light switch. If it is only a switch that switches on when you have your finger on the switch, then there is an addition to add to my description.

You have to wire in what is known as a Hold On or Retainer Contact and a stop switch. If this is the case let me know and I will talk you through that.

Cheers Steve

 
Excuse my very quick drawing. This is a single phase contactor. Presuming the switch is a typical light switch

contactor.jpg


Imagine you have installed this contactor, might make it easier to undertsand

nch8-20-household-contactor_33075.jpg


Evening All

Thanks for all replies really helpful as usual with this forum.

I have taken all on board and had another go ....

I think Im getting there but am slightly unsure on the wiring of the conntactor....(assuming I have this rest of it right that is???)

The other point is that it is not a standard switch but a push on/push off type hence the 4 connections.....

Cheers

P

View attachment 249

img087.jpg

 
Hi P

As you have wired it the contactor would be on all the time as you have your Live going straight to A1. A1 & A2 are your coil connections.

Not sure what type of switch you mean, if you say you have to push for on and then push again for off then it is operating as a normal light switch, if it is push for on, release for off then we have to go down the retainer contact route with a seperate contact. Are you given 2 switches for your exercise, a normally open switch and a normally closed switch? Need info on switches as it will decide how the circuit will look.

Sorry for some reason I can not see the drawing that sellers has posted, either me or the computer being dum. I also don't have a scanner or I would do a drawing for you. If I get time later I will try and draw it using computer.

Cheers Steve

 
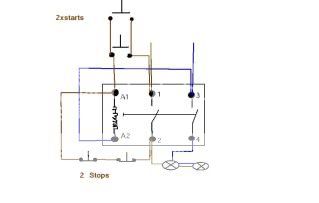
Heres an example using stop starts. Like this for a stop, and a green one for a start.

Pushbutton-Station-Cb2-Emergency-Stop-Pushbutton.jpg


I've shown my drawing with 2 of each as it shows you how to wire extra ones in. Stops wired in series, and starts wired in parallel.

Stopstartcontactor.jpg


I think your confusing yourself with the way your setting your drawing out.

To explain on my drawing. The Line (live) in the top is your supply.

This then goes to your first start. If you push this start the circuit completes by going round to the coil. Out of the coil down the neutral of the coil back to the incoming neutral.

Now the coil is energised it pulls the contacts in. and therefore switches the outgoing side on (your lights). The only way to keep the coil in when using a start button is to then take a live off the outgoing side and re-feed the coil with it. This then keeps it on once you've let go of the start button.

Now the contactor has a continuous supply and the only way to stop it is by putting your stop buttons in the way of this. So you position your stops on the link that re-feeds your coil. Once you break this link (ie. press the stop button) The whole proccess of pressing a start, thus bringing in the coil, therefore energising the lights and the return link to keep the coil in all starts over again.

Hope this helps, I'm not the clearest with explaining things sometimes.

 
Please visit this pdf

Then scroll down to the D.O.L diagram on page ten rember all stops buttons in series and start buttons in parallel.

Here is a small ladder diagram, perhaps it may help.

123.jpg

 
Last edited by a moderator:
Greetings

Thanks again for all the help.

My poor brain is at last coming to terms with all this.( I think)

I agree that the diagram I am using is helping in my confusion...but the reason I am using it is because it is basically a replica of what I have to use at college...

I have attached another version of what I think is the correct way of doing this. If its not right I hope its in the right direction.

I cant tell you exactly what type of switch it is except to say that you push on and push off.

The switch stays in.

I have had a look and have been unable to find it.However it has got a greeen start button and a red stop in the same unit.

Will take a photo monday if I remember.

One other thing the contactor is a pretty old one from what I can tell....autoline???????

Many Thanks again

P

View attachment 252

img089.jpg

 
Hi P

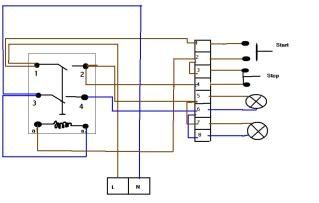
Still not sure on the contactor bit of your drawing, so it might be right, just not sure. So I have managed to get a scanner to do a drawing for you using your general layout. I have done the drawing with start and stop buttons that don't stay down as this is the most common and what you are likely to get at college, because of this I have used one of the contacts on the contactor as a retainer. The retainer contact is the one that is in paralell with the start button. Sorry if you know this already, so once the start button is pressed and released the contactor remains in as the live is kept on the coil via the retainer contactor. The only way to break this circuit is to press the stop button, this breaks the supply to the coil so dropping out the contactor feed and releasing the retainer contact. I have also done double pole switching on your lamps (L&N) both getting switched.

However how do I import the drawing onto here, as it is above the PDF file format size limit? my drawing is 122KB and in PDF format.

Cheers Steve

 
Cheers Steve

Regarding your drawing...

save it in a program like windows picture manager or something like that. the size seeems ok from what I can see.

Pat

PS

then go into the advanced section for writing a post and click on attachments and upload from there.

 
Last edited by a moderator:
Trying to upload but it says the limit for pdf is 19.kB mine is 122KB. So I imported it into a word and saved as that it is now a .doc file at 140kB still too big to upload.

I get an error message when i try to upload attachment saying file too big.

Any ideas?

Cheers Steve

 
Think I have finally managed to upload pic for you. Give the drawing a wee check and make sure you understand it, and that I haven't made a silly mistake while eating my breakfast and drawing this at the same time. :)

Cheers Steve

compress Picture.jpg

 
contactorfinal.jpg


This is in the way you have set out. Allthough there are numerous ways you could use the connections 1-8. I think this is the way your tutors are intending you to use them.

Its also better to draw on the switching of the contactor like I have then your tutors will be able to see what each connection on the contactor corresponds to.

Hope this helps.

 
Thanks Lads

Im going to go and have a good ol look at all this and will get back to you

Much appreciate your time for doing this

Pat

 
Hi Folks

Just to say that it all went well today.

Thanks to all who helped

here is a piccy of the assignment.

Wiring you see is incorrect by the way

View attachment 282

Ive gotta work out some circuit diagrams now with added lights and switches but I think Ive cracked that

All the best

P

DSC00061.JPG

DSC00061websmall.JPG

 
Thanks for the pic mate. Have you got one with the correct wiring?

Regards,

Admin.

 
No sorry ripped ait down before I thought to do it.

If I get a chance when someone else does it ill try and get a pic then

All the best

P

 
Top