Barge
Junior Member
- Joined
- Sep 6, 2009
- Messages
- 3
- Reaction score
- -4
First off since this is my first post here, I will intorduce myself... my name is Sam and i've just finished my apprenticeship and work in Bristol.
I signed up to this site looking for help and tips for the AM2 test and although there were some great responses to threads asking for help (AndyC springs to mind.) I couldn't find a solid thread covering the entire test.
So heres my attempt at helping you through the AM2 Composite installation,
I was lucky enough to pass my am2 first time round and these are the 3 biggest general tips I can give:
1.) PREPARE (fail to prepare = prepare to fail.)
When I did my am2 revision day they gave me a great booklet that I treated as my bible for 2 weeks prior to the exam. If you received the information pack for the am2 make sure you read through this a few times
thoroughly. You don't want any suprises in the exam to throw you off your game so make sure you know whats coming.
(link for information pack http://www.chelmsford-college.ac.uk/documents/am2/AM2Leaflet.pdf)
And as you have searched for am2 help online is a great start and shows your in the right frame of mind for passing this exam.
2.) MENTAL
Take it serious, but make sure you keep your cool. I saw a couple of guys in the room make a mess of the pyro or steel tube and they totally lost their composure and the exam was a loss.
REMEMBER it's only an exam and you can retake it for free! If you get into trouble on something, move on to something else, check your notes or ring a mate from work/college at lunch time for help and come back to it ready to smash it in.
It's worth noting also that the examiner's arn't nazis and may be able to help. (to a point.) They also allow you to bring books in. (The amicus brown book is worth taking and the yellow one will really help you out on testing. You can also take your revision book you recieve on the revision day, so make sure you do!)
3.) ORGANIZATION
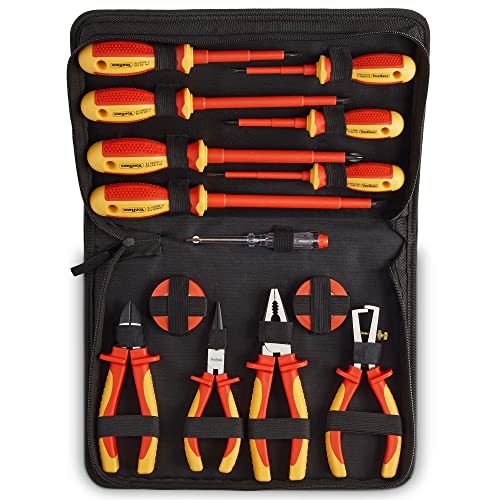
Get your toolbox ready with everything your gonna need the night before and if you have a tool belt this is gonna help you out a lot as the bays are quite crampt.
Write out in a list how your going to do your test ie. you might want to do the ring main first for a confidence boost, then the motor circuit etc. It really doesnt matter what order you do it in but even writing it down will make the task sink in a bit better.
Also remember that you cant take a Stanley type blade in, so take a suitable replacement or be ready to borrow one of the test centre's.
OK with that in mind we will walkthrough the different sections of the installation. (If your taking this
exam I am sure you are pretty competent at these tasks and won't insult you by writing how to wire a socket etc ) I will however lay down some tips that I think will help you out from the point of view of someone who has taken this exam...
1.) RING MAIN
Not a lot to say here, just remember that the single socket outlet feeding the heater has to be
wired as a SPUR. ( I took mine from the double socket. ) Also you will be wiring this back to the RCBO
so be aware that you may have to connect your 2 lives and neutrals into a connector block in the DB to
save the screws on the RCBO getting mullered.
- SRCD
On its own circuit, wired in 2.5mm, earth the box, not much else to day here. EASY MARKS!
2.) LIGHTING CIRCUIT
This might look confusing (especially to house bashers that only use T+E) but when you break it down it's alright.
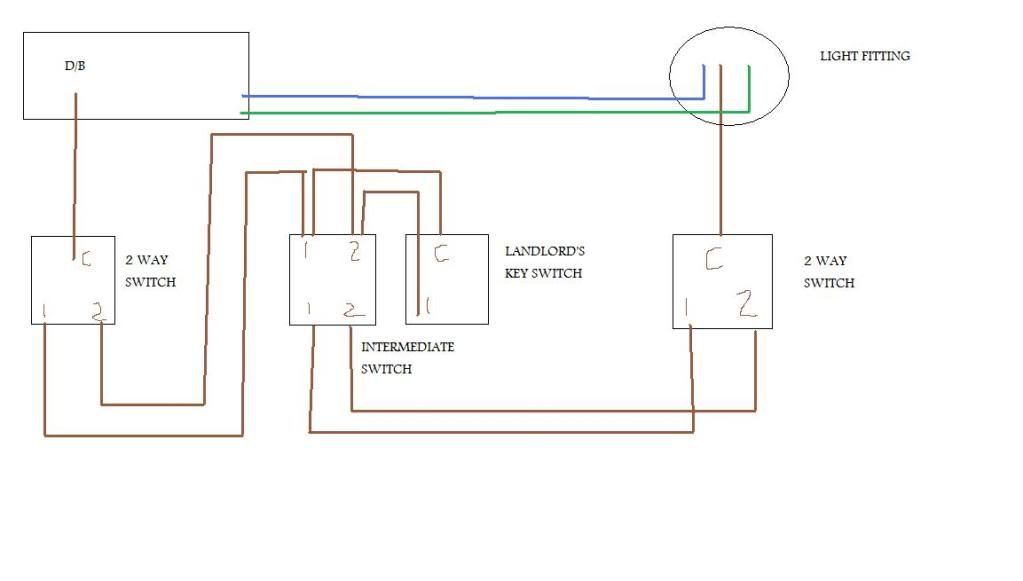
So what they want is a 2 way + intermediate switching system with a 'force on' keyswitch to a
single light fitting and a key switch before an emergency light to simulate mains failure.
It is easiest to break this up and look at my awesome picture...

The 'force on' Landlords key switch will be in a 2 gang grid switch with the intermediate switch.
The EMG test switch is really simple, the easiest way is probably to take your supply from the common of your 2 way switch into the top of your EMG key switch. Next, take a link from the 1. terminal on the bottom of the switch into the Neon that will be in the 2G grid with your keyswitch and finally take a cable from 2. up to your EMG light. (This will be fp200)
To get a neutral at your neon, take a neutral from your D/B straight to this neon, then out to both light fittings (the bulkhead and the EMG light.)
This was the easiest way I could think to do it and it worked for me but if anyone did it differently and thinks they're way is better let me know and if you dont understand send me a pm and I'll do you another horrible drawing
2 things to remember here!
1.) make sure you earth the grid switches/metal backboxes
2.) they supply heat proof sleeving for the bulkhead...USE IT!
3.) STEEL CONDUIT
One of the more difficult parts of the exam and I am no pro here, however there are a few things worth knowing that might help you out...
On the bender I used I was able to get the engineer's square against the former to
show where the true back of bend will be, this helped me out loads and with the help of my hammer I got it up without using the couplar.
Things to remember:
1.) take your time here this bad boy carries a lot of marks and its worth doing well.
2.) You are allowed 1 couplar and won't lose marks for using it, dont be
afraid to use more than 1 if you have to. (even if you used 4 couplars
you can only be marked down once.)
3.) Look for marks on the wall for back of bends!
4.) If you make a total hash of this they can give you a preset piece, keep in mind this will lose you ALL points in this section. (but the exam is still passable.)
5.) You're double set must be 250mm from the trunking.
4.) PYRO (MIMS)
Although older sparks at your work will tell you this is easy and a joy to work with, it is a
fact that most apprentices never work with this stuff until they get to the AM2.
The best thing you can do for yourself is to track some 4L1.5 down and practicing making off some ends. We had some gathering dust in the stores and my boss let me sit down and practice on it.
Get someone to show you the pyro tools and walk thru it with you (Ive tried searching online for a good guide with some photos but found nothing.)
Things to remember 1.) Try not to twist the cable, the cores will short out
2.) You don't get a pot with an earth tag, so use the sheath
3.) remember to bell out your cores, if any are down tell the examiner and he will tell you to leave one end disconnected. (I had 2 cores down!)
4.) Identify your cores, take all the different coloured tapes in with you.
5.) MOTOR CIRCUIT
This looks terrifying the first time you look at it but once you know where to start, this will be a cruise and points in the bank!
IIRC the far right of the top diagram they give you shows the supply from the d/b into the isolator. The supply is numbered 1, 3 and 5 and comes out of the isolator as 2, 4, and 6 after that its just dot-to-dot. Try not to stress over this too much, all will become clear and just try to remember:
1.) Identify all conductors (numbers are shown ondiagram and labels provided)
2.) Use 1.5mm singles and the control circuit can be wired in all brown if you wish
3.) Earth metal backboxes
4.) REMEMBER TO SET OVERLOAD! I cant remember if its 1.75 or 2.75 (sorry..)but when you do the fault finding you will see it set correctly on the test rig
5.) Put fork connector crimps on the motor terminals instead of ring, it will save you a couple of minutes when it comes to testing.
6.) BONDING
Few reminders here:
1.) Use 10mm for your main bonding (gas and water pipe) and remember to clamp beneath the 'T'
2.) use 4mm+ for the trunking and tray.
3.) If your joining 2 pieces of metalwork (ie the pipes) you must use only 1 piece of cable, strip the insulation and bend it over on itself.
Easy marks, but easy to forget!
7.) SWA
Again not really a lot to this, its a straight run with a single cleet, so make sure you're measuring and cutting is accurate.
1.) DONT FORGET THE BANJO!
2.) Make sure glands are tight
Well I think this is it, I hope this guide helped you somehow and took a little of the stress away.
It is a shame there is such a lack of resources on the net I would have loved to add the motor circuit diagram or photo guides to making off swa/mims but this was the best I could manage.
If this guide helped you or you're not sure about something I've written or spot a mistake please let me know.
ps. sorry if this guide sucked, it was my first. :coat
I signed up to this site looking for help and tips for the AM2 test and although there were some great responses to threads asking for help (AndyC springs to mind.) I couldn't find a solid thread covering the entire test.
So heres my attempt at helping you through the AM2 Composite installation,
I was lucky enough to pass my am2 first time round and these are the 3 biggest general tips I can give:
1.) PREPARE (fail to prepare = prepare to fail.)
When I did my am2 revision day they gave me a great booklet that I treated as my bible for 2 weeks prior to the exam. If you received the information pack for the am2 make sure you read through this a few times
thoroughly. You don't want any suprises in the exam to throw you off your game so make sure you know whats coming.
(link for information pack http://www.chelmsford-college.ac.uk/documents/am2/AM2Leaflet.pdf)
And as you have searched for am2 help online is a great start and shows your in the right frame of mind for passing this exam.
2.) MENTAL
Take it serious, but make sure you keep your cool. I saw a couple of guys in the room make a mess of the pyro or steel tube and they totally lost their composure and the exam was a loss.
REMEMBER it's only an exam and you can retake it for free! If you get into trouble on something, move on to something else, check your notes or ring a mate from work/college at lunch time for help and come back to it ready to smash it in.
It's worth noting also that the examiner's arn't nazis and may be able to help. (to a point.) They also allow you to bring books in. (The amicus brown book is worth taking and the yellow one will really help you out on testing. You can also take your revision book you recieve on the revision day, so make sure you do!)
3.) ORGANIZATION
Get your toolbox ready with everything your gonna need the night before and if you have a tool belt this is gonna help you out a lot as the bays are quite crampt.
Write out in a list how your going to do your test ie. you might want to do the ring main first for a confidence boost, then the motor circuit etc. It really doesnt matter what order you do it in but even writing it down will make the task sink in a bit better.
Also remember that you cant take a Stanley type blade in, so take a suitable replacement or be ready to borrow one of the test centre's.
OK with that in mind we will walkthrough the different sections of the installation. (If your taking this
exam I am sure you are pretty competent at these tasks and won't insult you by writing how to wire a socket etc
1.) RING MAIN
Not a lot to say here, just remember that the single socket outlet feeding the heater has to be
wired as a SPUR. ( I took mine from the double socket. ) Also you will be wiring this back to the RCBO
so be aware that you may have to connect your 2 lives and neutrals into a connector block in the DB to
save the screws on the RCBO getting mullered.
- SRCD
On its own circuit, wired in 2.5mm, earth the box, not much else to day here. EASY MARKS!
2.) LIGHTING CIRCUIT
This might look confusing (especially to house bashers that only use T+E) but when you break it down it's alright.
So what they want is a 2 way + intermediate switching system with a 'force on' keyswitch to a
single light fitting and a key switch before an emergency light to simulate mains failure.
It is easiest to break this up and look at my awesome picture...

The 'force on' Landlords key switch will be in a 2 gang grid switch with the intermediate switch.
The EMG test switch is really simple, the easiest way is probably to take your supply from the common of your 2 way switch into the top of your EMG key switch. Next, take a link from the 1. terminal on the bottom of the switch into the Neon that will be in the 2G grid with your keyswitch and finally take a cable from 2. up to your EMG light. (This will be fp200)
To get a neutral at your neon, take a neutral from your D/B straight to this neon, then out to both light fittings (the bulkhead and the EMG light.)
This was the easiest way I could think to do it and it worked for me but if anyone did it differently and thinks they're way is better let me know and if you dont understand send me a pm and I'll do you another horrible drawing
2 things to remember here!
1.) make sure you earth the grid switches/metal backboxes
2.) they supply heat proof sleeving for the bulkhead...USE IT!
3.) STEEL CONDUIT
One of the more difficult parts of the exam and I am no pro here, however there are a few things worth knowing that might help you out...
On the bender I used I was able to get the engineer's square against the former to
show where the true back of bend will be, this helped me out loads and with the help of my hammer I got it up without using the couplar.
Things to remember:
1.) take your time here this bad boy carries a lot of marks and its worth doing well.
2.) You are allowed 1 couplar and won't lose marks for using it, dont be
afraid to use more than 1 if you have to. (even if you used 4 couplars
you can only be marked down once.)
3.) Look for marks on the wall for back of bends!
4.) If you make a total hash of this they can give you a preset piece, keep in mind this will lose you ALL points in this section. (but the exam is still passable.)
5.) You're double set must be 250mm from the trunking.
4.) PYRO (MIMS)
Although older sparks at your work will tell you this is easy and a joy to work with, it is a
fact that most apprentices never work with this stuff until they get to the AM2.
The best thing you can do for yourself is to track some 4L1.5 down and practicing making off some ends. We had some gathering dust in the stores and my boss let me sit down and practice on it.
Get someone to show you the pyro tools and walk thru it with you (Ive tried searching online for a good guide with some photos but found nothing.)
Things to remember 1.) Try not to twist the cable, the cores will short out
2.) You don't get a pot with an earth tag, so use the sheath
3.) remember to bell out your cores, if any are down tell the examiner and he will tell you to leave one end disconnected. (I had 2 cores down!)
4.) Identify your cores, take all the different coloured tapes in with you.
5.) MOTOR CIRCUIT
This looks terrifying the first time you look at it but once you know where to start, this will be a cruise and points in the bank!
IIRC the far right of the top diagram they give you shows the supply from the d/b into the isolator. The supply is numbered 1, 3 and 5 and comes out of the isolator as 2, 4, and 6 after that its just dot-to-dot. Try not to stress over this too much, all will become clear and just try to remember:
1.) Identify all conductors (numbers are shown ondiagram and labels provided)
2.) Use 1.5mm singles and the control circuit can be wired in all brown if you wish
3.) Earth metal backboxes
4.) REMEMBER TO SET OVERLOAD! I cant remember if its 1.75 or 2.75 (sorry..)but when you do the fault finding you will see it set correctly on the test rig
5.) Put fork connector crimps on the motor terminals instead of ring, it will save you a couple of minutes when it comes to testing.
6.) BONDING
Few reminders here:
1.) Use 10mm for your main bonding (gas and water pipe) and remember to clamp beneath the 'T'
2.) use 4mm+ for the trunking and tray.
3.) If your joining 2 pieces of metalwork (ie the pipes) you must use only 1 piece of cable, strip the insulation and bend it over on itself.
Easy marks, but easy to forget!
7.) SWA
Again not really a lot to this, its a straight run with a single cleet, so make sure you're measuring and cutting is accurate.
1.) DONT FORGET THE BANJO!
2.) Make sure glands are tight
Well I think this is it, I hope this guide helped you somehow and took a little of the stress away.
It is a shame there is such a lack of resources on the net I would have loved to add the motor circuit diagram or photo guides to making off swa/mims but this was the best I could manage.
If this guide helped you or you're not sure about something I've written or spot a mistake please let me know.
ps. sorry if this guide sucked, it was my first. :coat


