hi admin
ok, i fixed it:O
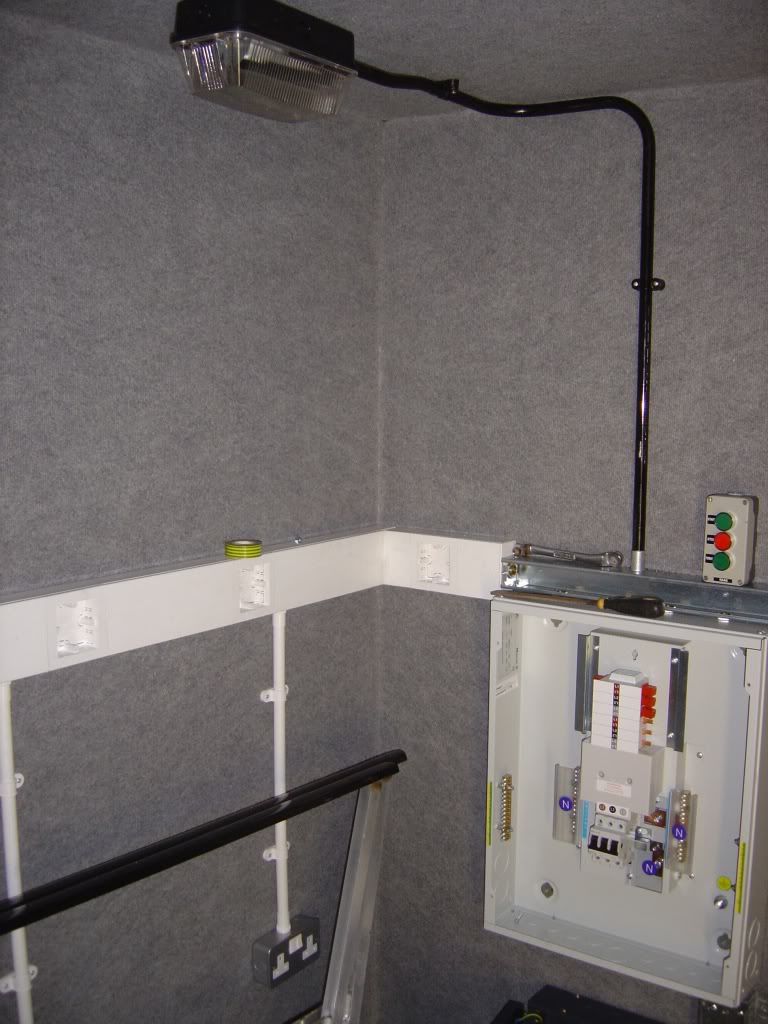
this would be a lot easier to demonstrate than explain but refer to the diagrams of bending previously posted then take a look at this photo. it is
slightly different to the AM2 you will do. This one was in a mobile wagon I did and the
dog leg set had to go at the light end. yours will go at the trunking end....
you will do it like this....and will start with a half length of tube with a thread already on one end. fit and tighten the coupling
1 - do the dog leg set
look down at the trunking and measure from the back of the hole, nearest the wall, to the wall. I will make up a measurement 16mm
Ok, your first set is now 10mm because the saddle on the wall holds the conduit off the wall by 6mm (16-6 =10)
so that is a dog leg set of 10mm within 250mm of the trunking end of the tube...
Now you cannot measure a 10mm set easily. The best way is to put the coupling end into the machine, just. put a little bend in it, then push through abit and rotate. now do another little bend. Dont worry if it is all over the place, you now lay it on the ground next to straight edge and eye it up and measure. you are aiming for straight, parallel and 10 mm away from the tube with the rest of it touching the straight edge. the tube is 20mm in diameter so the set should be about half a tube. if it is all over the show, simply pop it back in the bender and tweak it around till you get it good.
2 - do the first bend above trunking
Now measure from the trunking to the ceiling. I will make a measurement up of 1000mm. Now you will measure the conduit from the end you just set and mark it at 994mm ( remember the conduit does not touch the ceiling but floats 6mm off it due to the saddle)
i would then put the conduit on the floor and mark a "code" on it to show which way to bend it when it goes in the bender. in other words put it on the floor with the set facing up and not on its side.
If they give you black conduit i tape it to do all these marks.
now put it in the bender like the diagram, put the square to it and bend!
3- second bend to make light fitting
ok this is where it can get tricky now. refer to the posted diagrams then look at the photo againheadbangheadbang
this second bend is a "U" bend but cranked through 90 degrees.
so how do you do it?

because the two pre fitted saddles are on different walls you need to work off a common reference point. in my photo it is the far (left hand) wall....
first measure the ceiling saddle to the far wall, from one point on the edge of the saddle. i will make up a figure of 300mm
next measure the wall saddle to the same wall from the same point on the saddle. i will again make up a figure of 900mm
this now establishes that the distance across the two saddles is 900-300=600mm. in other words the bends are 600 mm centre to centre. now you cannot find the centre of the bend only the outside. the tube is 20mm so the distance for this "back of bend to back of bend" jobbie is 620mm
put the tube against a wall and measure out 620mm and mark the tube. next, you need to again mark a code on it so when it goes in the machine you bend it the right way..
you are nearly done now
the last measurement now is to make it exactly the right length so it is not too long or short coming out to meet the light fitting which is pre fixed on the ceiling. i will make that another post as i need more photos...
i hope this helped and did not confuse:coat
alan


